| By
Captain Scott Fratcher
This article discusses anchor windlasses, anchor deployment
systems and trouble shooting.
An anchor windlass is used for more than just raising the anchor.
With a little forethought the windlass can also be used to kedge
off, deploy a second anchor, raise a sail, serve as an emergency
tow point, or provide assistance in high wind and current berthing
situations.
In the basic form a windlass is used to haul up the anchor. The
anchor raising system carries heavy loads and can be dangerous.
Ideally the system should be “no touch”. In other
words the operator should simply push the button or crank the
handle to deploy or raise the ground tackle.
Windlass style
Windlasses come in horizontal or vertical configuration. While
they can each deploy an anchor they have specific other benefits
as well. For example a vertical windlasses can pull line from
any direction parallel with the deck. This makes for easy kedging.
Horizontal windlasses can pull fore and aft in line with the mast.
This makes for easy hauling of crew up the rig. Lets look at some
other advantages of different windlass styles.
Vertical Windlasses
A vertical windlass tends to have 180 degrees of chain wrap providing
a more secure chain “grab” of 3 to 5 links. Vertical
windlasses tend to take up less deck space, but must be matched
to deck thickness. The motor and gearbox are fitted below decks
where space must be provided in a “wet locker” space.
The motor can be serviced without removal of the windlass, but
the motor lives in the damp area. Vertical windlasses specifically
are not recommended to use as a boat’s securing point. In
other words if your vessel is under tow it is not recommended
to loop the tow line over the gypsy.
Horizontal Windlasses
A horizontal windlass tends to have 90 degrees chain wrap, seating
2 or 3 links, which can “skip”. This may mean slipping
chain in foul sea conditions.
Horizontal windlasses have the distinct advantage of mounting
without concern of deck thickness, or below deck obstructions.
A wide, thick king plank is not an issue when only simple thru
bolts mounts the windlass to the deck.
Horizontal windlasses can also service more than one anchor.
It’s simply a matter of ordering an extra gypsy to fit on
the other side of the windlass. Some models provide an added line
gypsy to provide up to four line handling options.
Lastly, and possibly the most important benefit of a horizontal
windlass is the housing is directly bolted to the deck, thus the
winch may provide “horns” that can be used as a mooring
or towing post.
Chain Lockers
The chain locker should be narrow, deep, on the centerline and
for weight consideration as far aft as possible. The chain locker
should be able to handle a minimum of 75 to 100 meters of chain.
Chain locker drainage should be thought out, running either overboard
or routed into the bilge.
Most often we see chain lockers wide and shallow. This causes
two problems for anchoring.
1. When reeling the chain in it tends to pile up and fall over
on itself causing chain wraps, or worse; pile into a small mountain
that prevents more chain from entering the locker unless a crew
member is flaking the chain by hand.
2. When deploying the anchor chain, if the locker does not have
sufficient height below deck jams may result.
These annoying issues can be prevented with good chain locker
planning and design.
Secondary Uses
A decision to make when purchasing a windlass is what secondary
uses the windlass may encounter. A capstan on a vertical windlass
can make for easy kedging, but needs a second block to help haul
someone up the mast.
It’s worth planning out simple methods of running lines
on the bow so kedging, docking, or towing is thought out ahead
of time. In this way, during docking a bow line can be passed
and secured to the dock. The bow crew simply pushed a button to
reel in the bow line to proper tension providing a safe method
of controlling even the largest vessels.
For this reason a windlass with a separate line gypsy and chain
point are an advantage. Simply loosen the break and wrap the line
over the remaining gypsy. Remember to plan for port and starboard
line feeds.
Installation
Installation considerations are more complex than simply following
the installation instructions. The location choice must considered
carefully. The placement must be one that allows the anchor to
secure to deck without rattling. The chain must fall through gravity
into the chain locker without help from the operator. If space
permits it’s often a good idea to mount the windlass so
the vessel can take an anchor one size up from the current anchor
to accommodate cruising or storm anchoring.
The up/down buttons should be located in an area safe from accidental
activation, but in a location the operator can see the complete
run of chain during operation. This is particularly important
during the final seating of the anchor. When the anchor shank
reaches the roller the anchor will often be swinging and twisting.
Tapping the ‘up’ button at the exact right moment
will ‘snap’ the anchor home into the roller.
The area chosen to mount the windlass must be extremely strong.
The anchor windlass can produce tremendous loads on the foredeck.
The bolts should attempt to ‘grab’ the foredeck in
such a way no flex is possible. Flex over time will cause leaks
that start the downward spiral of maintenance and replacement.
Large backing plates that cover an area much greater than the
actual windlass will help reduce flex and increase ultimate strength.
The windlass needs to be mounted down with some type of sealant.
Some recommend using a strong bonding sealant such as 3M 5200
claiming the extra attachment to deck provides more strength in
the mounting. Others argue using a bonding sealant that is too
strong will discourage the dis-mounting” for service causing
more problems in the long run.
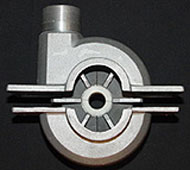
The Chainwheel to chain connection
The gypsy connects the windlass to the chain or line. The critical
issue is chain wrap. Wrap translates to contact area. The better
the connection between the chain and the windlass the less we
have to concern ourselves with the chain skipping or jumping.
Nothing increases chain contact are like increased diameter.
If space is a problem some chain wheels arrive with a spring
loaded chain capture device that can help overcome some skipping
issues. Besides chain wrap it is critical the chain size matches
the chain wheel perfectly.
Grant Macduff from
Chain and Rope in New Zealand adds this-
"skipping issues more than 'very very occasionally it'll
skip once' generally mean the wrong size chain is fitted. We are
seeing a lot more lately - see comment below about lack of knowledge
in most chandlers"
Chain Size
Chain size is more complicated than simply knowing the typical
“8mm or 10mm chain”. To match the chain to the gypsy
the following should be measured and kept as a record onboard.
• The inside link length
• The outside link length
• The outside link width
• The inside link width
• The inside dimension between 11 links
If you are unsure of your chain size you can send an 11 link
sample to Maxwell Marine in Albany and they can do a proper sizing
in their complete factory. They have an amazing chain library
and will likely be able to identify yours.
Some good suppliers will give you a Test Certificate or Information
Sheet to put in your boat files for future reference. This will
have the critical information on it. {we do as standard for offshore
cruisers, anyone who changes standard and anyone who uses above
12mm chains. Just makes it way easier for everyone next time}
• The inside link length
• The outside link length
• The outside link width
• The inside link width
• The inside dimension between 11 links
Grant Macduff from
Chain and Rope in New Zealand adds this-
"Outside length can be changed by differing methods
some use to calibrate the chains. For example PWB 'squish' theirs
so it often has flat ends. The little chinese that is calibrated
(a big failing of chain from there is the total lack of calibration)
can be called a Xmm chain but is actually an imperial wire size,
so again it can modify measurements. A small excess of galv will
do it also. ALWAYS measure the internal link length on a not worn
link and use verniers as MK1 Eyeball has wildly varying accuracy
levels."
"No one uses outside widths, that may just confuse
people."
Chain type
Anchor chain type is more complicated than just diameter, and
dimension. We also have manufacture grades. In New Zealand we
have four basic standards of chain.
• Din 766 is the most common grade from Europe
• EN818 another European standard now less used in NZ
• PWB from Australia
• Imperial sizes left over from imported boats. Imperial
sizes are the most difficult to match as they are not commonly
sold in NZ, but there is a steady demand due to left over Imperial
gypsies.
What this size/standard of chains means to the boatie is careful
measurements and records must be kept, so the ordering of new
chain is easy and trouble free.
Grant Macduff from
Chain and Rope in New Zealand adds this-
"Anchor chain type is more complicated than just diameter,
and dimension. We also have differing Grades, Standards and finishes.
In New Zealand we have four basic grades of chain Standards. This
is in relation to Anchor chains only, there are a lot more but
they are related to lifting and other uses.
The common Standards are -
• Din 766/A which came out of Europe originally and is metric
based. is the most common grade from Europe
• EN818-3, another one out of Europe, again metric based
another European standard now less used in NZ {the '/A' and the
'-3' are very important as there is also /B, /C. -1 and -2, which
are different again} EN Standard chain is very common in NZ actually.
• PWB from Australia AS2321, which is Australian and a little
out on it's lonesome, roughly metric but from an old imperial
base.
• Imperial sizes left over from imported boats. Imperial
sizes are the most difficult to match as they are not commonly
sold in NZ, but there is a steady demand due to left over Imperial
gypsies
Proof coil (fading away)
Seen very occasionally is the NACM Standard (National Association
of Chain Manufacturers) which is mainly US only and based on imperial
rather than metric. No-one in NZ stocks this Standard but some
sizes do cross-over with some of the DIN or EN sizes.
The term Standard relates to physical sizing of the chains.
Some Standards also have some minimum load requirements, tolerances
allowed, material quality and other things like that. The DIN766/A
and EN818-3 Standards are the most common 'default' world standards.
The AS2321 is pretty much Australia only but there is some cross
over on some sizes with the DIN and EN.
'Proof Coil' means the chain has been Proof Loaded, The DIN,
EN and AS Standards have proof Load minimum requirements also.
The problem we face today is what load has the chain been Proof
Loaded too, sadly much out of the East has very low proof loads,
well below what NZ has had until the arrival of these chains.
So if you get some 'Proof Coil' it means nothing unless you know
what the proof load actual was. The Proof Load is twice the Working
Load Limit and 1/2 the rated Break Load.
The common Grades are -
Some from the east - usually low quality with un-verifiable load
numbers. Some is good and some is bad, knowing which one is being
sold to you have is the hard almost impossible sometimes part.
Grade L (what used to be called Grade 30 or G30, 'BBB' in the
US) - Quality brands available in NZ are PWB and Serafini, both
AUS manufacturers. Maggi Catene out of Italy. Some of the chinese
made occasionally.
Grade M (was grade 40 or G40, G4 or 'HT' in the US) - Maggi Catene
out of Italy
Grade S (Grade S or Schedule 70 or G70) - Maggi Catene. Note -
this is Hot dip Galv and finished at G70. Galvanising a G70 won't
work and is the realm of very specialist galvanisers only.
Some from the East has low loads and is soft so it needs
to be looked at very closely before purchase especially so if
you will be pushing it hard at times.
Grade L is what most people would have on their boat now. A Grade
L 8mm short link chain has a WLL of 800kg, a 10mm of 1250kg
Grade M is becoming far more common from quality manufacturers
and can be got for the same price as Grade L if you hunt around.
A Grade M 8mm short link chain has a WLL of 1000kg, a 10mm of
1600kg.
Grade S is a true High Tensile chain with very high loads. It
is available but as you would expect not at the cheaper end of
the spectrum. A 8mm Grade S short Link chain has a WLL of 1400kg
and a 10mm of 2200kg. Grade S also features a higher safety margin
of 5:1 where Grades L and M use a lower safety margin of 4:1.
What this size/grade of chains means to the boatie is careful
measurements and records must be kept, so the ordering of new
chain is easy and trouble free."
Chain twist
Whatever chain you decide on be sure to use a swivel between
the anchor and the chain. This swivel will help prevent chain
twist that can cause skipping of the chain on the gypsy thus preventing
premature wear and possible damage.
Bow roller
The bow roller is meant to secure the anchor while in port and
provide a smooth method of passing the chain into the water The
farther the bow roller extends from the boat’s bow the less
chance of the anchor swinging into the hull causing paint chips.
However a long bow roller means greater strength and support structure
is needed. It is recommended a groove be built into the anchor
roller. This groove helps keep the anchor chain in a steady line
during the raising or lowering of the chain and further preventing
twist or chain skipping.
Maintenance
A windlass is often the most neglected piece of equipment on
board. It’s located in the worst of the sea spray exposure
and often gets little more than a casual pre-season cleaning.
A windlass is a fairly simple mechanical device and worth spending
a bit of time to get to know. Richard Arthur of Maxwell Marine
recommends using CRC type spray on the electronics every season
along with pulling the gearbox apart every three years to inspect
the seals and change the oil. The clutch cones must be greased,
even though they arrive dry. The electric motor should be opened
and the carbon from the motor brushes removed.
Chainstopper
The windlass is not meant to hold the load of the boat while
at anchor. This is the job of the snubber, or the chain stopper.
Cyclical loads due to passing waves is the number one reason windlasses
wear. “The windlass is a winch for hauling and deploying
chain, not a mooring post” says Ron Czerniak, Marketing
Sales Manager at Maxwell.
A snubber is a simple line with a hook or rolling hitch that
grabs the chain holding the boat’s load. This line adds
a bit of “spring” to the anchor system and prevents
the multiple loads from wearing the windlass drive.
A chain stopper is mounted to deck between the windlass and the
roller. This securing point holds the chain load. An added benefit
of the snubber or chain stopper is the windlass is free for other
uses, like controlling a second anchor or lifting our crab pot
for dinner.
Winch power
There are three common methods of powering a winch.
• Electric
• Hydraulic
• Manual labor
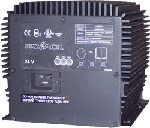
Electric
Electric is the most common form of power on the smaller yacht.
The windlass motor is simply a small starter motor that is connected
to a gearbox. The yacht will need a good strong electrical system
to support an electric windlass load. A windlass can draw 60 amps
reeling in chain without a load, and over 300 amps when working
hard. Electric has the advantage of an easy, clean installation.
The most common problem when installing an electric windlass
is undersized feed cables. Remember long runs at 12 volts equals
voltage drop. Voltage drop means increased amps and heat in the
windlass, shortening the life of the windings.
Note-When running large low voltage leads it is critical the
leads do not cross each other. The crossing point can make a chafe
spot that can become a fire hazard. Instead run the cables next
to each other paying particular attention to the feed at the winch.
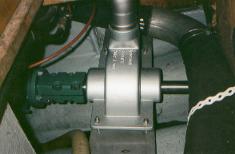
Hydraulic
Hydraulic power is common in boats above about 18 meters. A large
windlass, and long run times are common reasons to use hydraulic
power. Hydraulics make particular sense if the boat already has
a hydraulic system installed. IE deck winches, fishing winches
etc.
Hydraulics have two distinct advantages over electrical. Hydraulics
have a reputation of running trouble free in extremely wet conditions
and they don’t need a reduction gear.
The reduction gear from the high RPM electric motor to the winch
is a source of wear and expense of a windlass system. Hydraulic
motors run at low RPM’s and high torque thus eliminating
the gearbox.
Manual
Manual is the preferred system for boats with little or no electrical
supply or for those on a tight budget. The main advantage is dependability.
Manual windlasses rarely fail, or run out of power. They tend
to be slow and in cases of emergency or short handed sailing can
make for difficult choices between time at the helm and time on
the foredeck. Better manual winches have two speeds giving greater
options.
Trouble shooting an anchor windlass
Anchor windlass problems typically fall into three categories
• Slow response
• No response
• Skipping or clogging chain
Slow response in an electric windlass normally means:
• Bad connection
• Low voltage
• Binding gears
• Failing motor windings.
Start the trouble shooting by testing voltage at the motor while
under load. The voltage should be above 12 volts. Less means voltage
drop in the feed cables, or a poor connections. Work your way
back along the cables toward the batteries or power source testing
at each connection till you find the voltage drop.
Slow response with good voltage may mean internal windings may
have begun to fail, or the motor may be binding internally. IE
rusted bearings or swelled rotor.
Slow response may also mean the electric motor has begun to work
it’s way loose from the gearbox. Switch the windlass from
forward to reverse and watch the motor. You should not see any
movement. If you see the motor wiggle this is a sure sign the
housing has come adrift and needs some the bolts tightened.
Slow response in a hydraulic windlass may mean a worn motor vanes
or low supply pressure. Check pressure at the motor (as you would
voltage) and follow the same procedure you would in an electrical
system working your way back till you find good pressure.
No response
No response typically means a complete loss of power IE fuse,
a solenoid had failed, or the small control circuit wires have
come adrift. Check for control voltage at the solenoid control
lugs. A good reading of control voltage means the wires and supply
circuit are working, but the solenoid is not passing the voltage
or hydraulic pressure.
Skipping and clogging chain
Skipping, and clogging chain, are two separate problems. Clogging
chain may mean the anchor box is too wide thus the chain pile
falls over on itself causing a jam on deployment.
Partitioning the chain box with timber, to make the chain area
taller, can sometimes rectify this clog. Sometimes a crew member
has to stay forward flaking the chain with a boat hook to prevent
the pile up.
Clogging on deployment is often caused by chain that has fallen
onto itself, or is paying out so fast the chain does not have
time to hang straight. Slowing deploying chain till the first
third is released can help.
Skipping chain is caused by miss-matched chain to the gypsy or
the chain my have worn or stretched, or the gypsy may be wearing
out. Stretched chain needs replacement, while a worn gypsy chain
pockets can be built up by most any engineering shop.
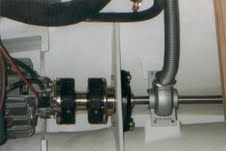
Cyclone anchor system
After years of cruising in cyclone prone waters we mounted a
second line spool behind the anchor winch. This spool holds three
75-meter sections of line end to end. This provides a quick deployment
of three additional anchors, or one long line for the sea anchor
or emergency tow.
The system allows us to delay anchor deployment till the final
few hours before the cyclone winds strikes an anchorage. This
has two distinct advantages.
First, if the forecast changes and the cyclone veers away at
the last minute we don’t have 300 meters of dirty anchor
rode to clean.
Second we can wait till all other boats have chosen their anchor
spot before we commit to our location. Commercial boats may arrive
late dropping anchor in a way that endangers the yacht fleet.
By having the majority of our gear on deck we can easily relocate.
On a possible direct hit the cyclone eye may pass to either side
of the anchorage meaning the wind direction may be completely
unpredictable. By waiting to drop our gear we can use the final
forecast help decide on our chosen location.
Note-In 1991 our yacht was left on a mooring in Mexico for the
cyclone season while we returned to work. A cyclone landed a direct
hit on the anchorage driving over 60 of the 120 boats ashore.
Not one occupied yacht was grounded. The lesson was every boat
with crew aboard was able to do something to prevent grounding,
while the un-occupied vessels left to their own devices found
themselves in peril.
Adapted from "How
to make money with boats" by Scott Fratcher
|
Anchor
windlass
.JPG)
.JPG)
.JPG)
.JPG)
.JPG)
.JPG)
.JPG)
.JPG)
.JPG)
.JPG)
.JPG)
.JPG)
.JPG)
.JPG)
.JPG)
.JPG)
.JPG)
.JPG)
.JPG)
.JPG)
.JPG)
.JPG)
.JPG)
.JPG)
.JPG)
.JPG)
.JPG)
.JPG)
.JPG)
.JPG)
.JPG)
.JPG)
.JPG)
.JPG)
.JPG)
.JPG)
.JPG)
.JPG)
.JPG)
.JPG)
.JPG)
.JPG)
.JPG)
.JPG)
.JPG)
.JPG)
.JPG)
.JPG)
.JPG)
.JPG)
.JPG)
.JPG)
.JPG)
.JPG)
.jpg)
Click on file to download high quaility plans
.JPG)
.JPG)
Basic Fast Flow Emergency Bilge Pump Kit
$599USD plus shipping
Fast flow pump installed.
Always ready - Alwasy pumping

Pump arrives in parts for easy install. No need
to remove the prop shaft
Prop shaft bilge pump installed and ready for
use
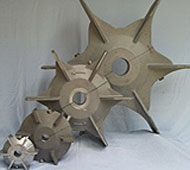
Impeller blades split in two for easy install
and come in various sized to meet every boat's needs

Pump is ready for installation.

This is a safe boat with the Fast Flow propeller
driven bilge pump
Example of a propeller driven Fast Flow bilge
pump in operation
Fast Flow emergency bilge pump in position ready
to save the day
Basic Fast Flow Emergency Bilge Pump Kit
$599USD plus shipping
Order your books by Scott Fratcher here
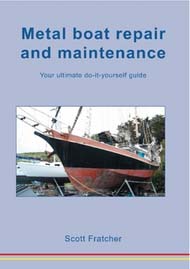
Metal boat repair and maintenance. A must read for any steel boat
owner.
Print:
$31.10
Download:
$12.00

How to repair a steel boat without sandblasting. Special report.
Download:
$4.00

In order to get a good job as a marine engineer we need a marine
engineer licence, commonly called a Certificate of Competency
Print:
$39.49
Download:
$29.50
How to get a job on a mega yacht as a marine engineer? It can
be done without a licence.
Download:
$4.00
50 money making ideas run from a boat
Print:
$39.90
Download:
$39.90
Make money with boats? You bet! It's done every
day, but most people won't tell us how they did it. This book
is a tell all to give the layman the tools needed to start their
own onboard cruising business.
How to make money with boats has become an instant
classic selling around the world making dreams come true. If your
planning a cruise, or your know somone who is this is the perfect
book.
Print:
$39.90
Download:
$39.90

Print:
$21.37
Download:
$9.00
How to buy boats cheap? Dozens of tricks used
by adventurers around the world every day. This book is a must
read for anybody ready to purchase a boat.
Print:
$29.96
Download:
$9.00
The race was a heartbreaker, but eventually Earthrace took the
round the world speedboat record. This book is the log and blog
of the 2007 race where Earthrace set dozens of fastest ocean record
crossings.

Download:
$12.00
Earthrace in color. The same book as above, but in vivid color
to bring all the race moments right to the reader.
Print:
$14.97
Download:
$9.00
Anchor King is a narrative book of short stories of the Sausalito
California waterfront in the late 1980's. Anchor King contains
the award winning short story "Sex Toys?"

Print:
$115.47
Download:
$5.00
Tjalk Operator's Manual is an example of how
to build a yacht manual. Over 300 pages showing how to drive a
twin engine, single rudder vessel and much more.
|