| By: Scott
Fratcher - Marine Engineer/Captain
Cleaning up a boats wiring harness is a semi-easy project
that is almost all labor, thus the improvement to a yacht costs
only a weekend of dedicated time for the DIY. It’s a great
beginner electrical project as the improvements made involve more
organizational and visual skills, than electrical design. Often
the breaker panel is still serviceable, along with the rest of
the electrical hardware, but wire runs have been added without
thought over the years until the back of the panel is a confused
rat’s nest of a mess.
A typical 70-breaker panel takes about three days to completely
re-wire. This same system also works on main battery cable distribution
Sometimes the electrical system has been giving random trouble
for a long time. Turn on an electrical device and it works this
week. Next time nothing happens, causing frustration for the crew.
It may be worth performing this project simply to have the distribution
panel cleaned and organized. This way when a fault occurs that
is out of the scope of the typical DIY the owner can stop paying
electricians to search through the baffling bundles of strange
wires. Next time that real electrical fault occurs the hired electrician
simply opens the electrical panel, sees all the organized labeled
wires and begins work. A clean electrical panel also increases
the value of the vessel making her easier to sell.
If the wiring panel on your personal boat is suffering from this
problem then consider practicing and learning this skill on your
own boat.
The steps to transforming a rat’s nest electrical system
to stylized, organized wire ways are:
1. Study the electrical panel and map out a clean design
2. Label all the wires
3. Cut the wire panel free
4. Screw in wire cleats to the perimeter, run the new wires
5. Lay new electric panel wires in nice stylized bundles
6. Connect the transformed panel to the old wires
7. Test every circuit
1. Design
Let’s start with the design. Imagine the new wires neat,
clean, tidy and in place. All wires should run along the outside
of the box. All wires should run straight, and corners should
be tight and rounded. Map it out. Often I will use a pencil and
draw the lines where wires are to follow. Use a circle with a
plus sign to show positive and a circle with a dash to show a
negative. When the project is complete the important labels can
be finalized with a black marker.
Is it easy to comfortably stand and see into the back of the
electrical panel? Often electrical panels can only be accessed
by looking around a corner. We want to make it easy to work on
the panel in the future. An easy to access panel is a panel that
is easy to keep tidy.
The negative bus bar should be tucked away on one side of the
box with the wires feeding in a neat clean manner, while the positive
wires should feed to the breaker panel. Be careful to consider
how the wires will lay when the panel is closed. We don’t
want the main positive buss bar to lay directly over the negative
bus bar. Consider what would happen if the breaker panel were
accidentally crushed inward against the back of the electrical
box.
Try to make an easy way to open the panel. Because most panels
are screwed shut the panel can be made to hinge and hang on electrical
ties. Electric tie hinges are sufficiently strong for most applications
and cost almost nothing. A small piece of nylon line can be used
to limit the extent the panel opens
On an opening panel the wire bundle should lay inline with the
hinge. Leave the wire ties loose, but just tight enough to keep
the wires from losing their position in the bundle. This will
make the panel easy to open and close. The idea is the wire bundle
will not have to be pushed into the electrical box because the
wires working the “hinge” will simply rotate inside
the bundle.
All wires should run the perimeter of the electrical box. This
is important as when the next electrician comes along to run a
new wire he will follow the old wire routes. To the boat owner
this means once the wire ways are organized all new wires added
will also be clean and tidy. This is a long-term solution to eliminate
wires that are draped over the interior of the electrical box.
Study the photos shown in this article to get an idea of what
is possible and make your project a work of art. Remember nobody
can see the electricity moving through the wires. The wires should
be neat and well labeled. Consider yourself a “wire stylist”
more than an electrician at this point.
If you’re ready to begin work then turn off all power to
the boat. Shore power plugs should be pulled from the outlets
and batteries should be disconnected on the positive side. Turning
off switches is not enough, as you never know how the wires were
powered. Remember raw wires are going to be lying around during
this project. Be sure none can become energized.
2. Label all the old wires
This might be the most important step in the process. I use blue
tape and a black marker to make temporary tags on the back of
each of the old wires. Look on the front of the electrical panel
and make a label that corresponds to a breaker. Wrap that label
on the wire running to the specific breaker.
3. Cut the wire panel free
Cut the wire leading to the breaker leaving the label on the
boat side of the wire. The idea is to be able to reconnect to
the boats electrical system without having to trace any wires.
Work all the cut wires into straight lines just like you were
combing a messed up head of hair. Work the straightened wires
to the corners of the electrical box till all wires are leading
into the box in one, two or maybe three entrances.
4. Screw wire cleats into the perimeter of the electrical box.
Insert wire ties into the cleats and leave big loose loops the
wires will be fed through. In the photo above we see wire ties
set into wire cleats. The bottom wire tie is a special type with
a screw hole pre-made. I prefer to use a wire cleat as I can always
add a new wire tie as the electrical system grows
Tip-Wire way corners are notoriously difficult to make look clean.
By the end of a project every time a wire comes out a bit short
the electrician gives a tug and the corners are made shorter and
rounder.
The way to keep the corners “clean” is to add a temporary
wire cleat to each wire way corner. The extra cleat pulls the
wire way a bit farther toward the corner than one might think
is needed. In the end this keeps the wires from “cutting
the corner”. When the job is complete pull the temporary
corner cleats to leave a beautiful finished looking clean wire
way pushed right into the corners.
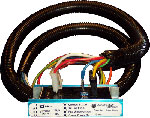
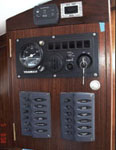
5. Lay in new wire in stylized bundles
Now comes the fun part. Write on heat shrink to label the wire
ends (see sidebar). Attach each new wire to the free breaker panel.
Hold the breaker panel switch side up and wire side down. Let
the wires hang. Make each wire into a nice easy bending corner
and add a small wire tie till you have a complete new wire bundle
(see photo). Each wire tie can be made snug, but not completely
tight.
Once the complete panel is wired take a moment and examine your
job. Make sure all wires have the same radius of bend. Work all
wires in the loom flat, and check for wires that wrap around the
loom. See that the wires along the back of the breakers do not
have a hump. Once you are satisfied the project is a real “work
of art”, begin the final tightening of the wire ties. Don’t
cut the wire ties till you read the sidebar for special instructions
on cutting a wire tie
Tip: Add a wire to each breaker in the panel even it that breaker
is not in use or was left as a spare. Run the wire tail into the
bundle with the rest of the wire panel loom and coil it into the
electrical box with a butt connector already attached. When the
time comes to add another electrical component you simply use
the pre-made and pre wired tail without having to dig into your
“work of art” electrical panel.
6. Connect the transformed panel to the old wires
Once you have the new electrical panel wired use butt connectors
to join the newly wired panel back to the old wires. (See side
bar for making a good but connector)
7. Test every circuit
This is important. Every aspect of your work should be tested.
If you have a clamp amp test for correct load on every circuit.
Compare this load to the rated breaker.
If all looks good tighten the wire ties inside the electrical
box. I like to leave the wire ties just a little loose. Enough
so I can slide two or three more wires into the bundle. This way
I don’t have to cut out all the old wire ties when the time
comes to wire in a single new electrical device.
Tip-Take a before photo of a panel and leave the photo in the
electrical box. This is great for the wow factor, but also encourages
all new installations to take the time to make the project tidy.
Nobody wants to start down the old road of rat’s nest wiring.
How to make a simple, inexpencive wire label
Making a professional label on wires can be completed easily
and inexpensively by the use of heat shrink and a fine tip marking
pen. Labeling is especially important as most smaller yachts don’t
have a wiring diagram to give the user a head start.
Every wire should be labeled on each end and at every connection.
This will make it much easier to trace wires in the future and
provides those who follow your work a head start on any project
undertaken. Just the time saved by not having to pay your electrician
to trace out wires can cover the small added cost of the heat
shrink.
Purchase inexpensive thin heat shrink, without the added gooey
sealer. Consider the color: red for positive, black for negative;
careful with the color yellow. Yellow was often used as a label
color, but now is used in some areas to show negative. This color
change is because the old low voltage negative color indication
of black was also the “hot” lead for the US electrical
system. Many an electrician got a shock by grabbing a “negative”
lead only to find it was the “hot” lead from the AC
side of the panel.
Lay the heat shrink flat and write in clear, large letters the
name of the breaker feeding the wire. Other methods of labeling
might be “To Alt” or “Feeding Start Batt”
to give the user a clear direction of what function a wire is
performing. When labeling an inline fuse tell what the fuse is
protecting and the amperage of the replacement fuse.
Now comes the stunning part of the system. Slide the heat shrink
over the wire and shrink it down. The large letters now take on
the appearance of scrimshaw, looking clean and tidy.
Tip-If you need to use an inline fuse, attach a pack of spare
fuses near the fuse holder with a wire tie. Point this out to
your crew so if the fuse ever blows everyone knows they only have
to open the pack and change to the right amp fuse.
How to make a good crimp, and trim a wire tie.
Crimping is the one of the standard methods of connecting wires
on small yachts. Typically one of two types of crimp connections
is used.
The crimp connection in the center and bottom are best crimped
with a ‘toothed’ type crimp tool. Look down the center
of the connector and identify the seam left over from manufacture.
If you can’t find the seam the inside wire stop is on the
opposite side of the connection seam. Place the ‘tooth’
on the same side as the wire stop and across from the seam. Many
technicians squeeze a bit of silicone grease into the connector
to prevent corrosion over the years.
The crimp type connection shown on the top of the examples is
more expensive, but comes with built in heat shrink. This type
of crimp connection should be squeezed with a non-penetrating
type of crimp tool and not the ‘toothed’ type of tool.
The tooth cuts the fragile heat shrink breaking the finished seal.
How to trim a wire tie
Ever reach your arm into a compartment only to have an old wire
tie scrape your skin? I really dislike it when that happens. That
cut comes from the little stub left over from the removal of the
wire tie tail. This is because a typical pair of side cutters
has a bevel cutting face and the bevel makes the cut slightly
off the surface of the wire tie.
To prevent this forearm-cutting left over stub cut your wire
ties with a pair of flush cutting side cutters.
Flush cutters don’t leave that irritating little arm cutting
stub, but because they don’t have the protective bevel they
are much more fragile than regular side cutters. For that reason
only use your flush cutters for cutting wire ties.
Tip: You can make a pair of flush cutters from a pair of regular
inexpensive side cutters by simply laying the back of the cutting
surface on a grinder and removing the bevel. Take your time so
you don’t heat and thus soften the cutting surface.
Adapted from “How To Make Money
With Boats” by Scott Fratcher.
.Here
is a link to an article on methods of crimping wire terminals.
Electrical upgrades and trouble shooting
Note-The addition below is to give ideas.
I am currently not available for small projects.
Scott
Scott is a very good trouble shooter.
He has solved many long term problems in the first hour onboard
many boats. He has a very good reputation and is known for his
ability to solve difficult and complex problems in a short time.
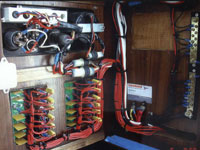
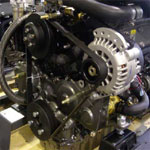
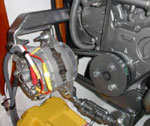
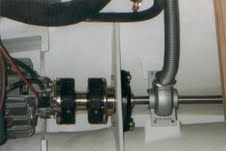
The first set of photos is of a panel
built for Yanmar Engineering Services by Scott in 2005.
The panel opens and closes easily.
|
Electrical
Panel Upgrade
.JPG)
.JPG)
.JPG)
.JPG)
.JPG)
.JPG)
.JPG)
.JPG)
.JPG)
.JPG)
.jpg)
.JPG)
.JPG)
.JPG)
.JPG)
.JPG)
.JPG)
.JPG)
.JPG)
.JPG)
.JPG)
.JPG)
.JPG)
.JPG)
.jpg)
.JPG)
.JPG)
.JPG)
.JPG)
.JPG)
.jpg)
.JPG)
Basic Fast Flow Emergency Bilge Pump Kit
$599USD plus shipping
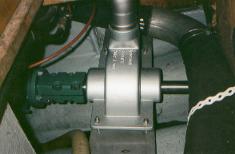
Fast flow pump installed.
Always ready - Alwasy pumping

Pump arrives in parts for easy install. No need
to remove the prop shaft
Prop shaft bilge pump installed and ready for
use
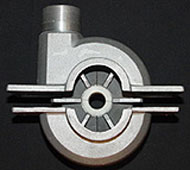
Impeller blades split in two for easy install
and come in various sized to meet every boat's needs

Pump is ready for installation.

This is a safe boat with the Fast Flow propeller
driven bilge pump
Example of a propeller driven Fast Flow bilge
pump in operation
Fast Flow emergency bilge pump in position ready
to save the day
Basic Fast Flow Emergency Bilge Pump Kit
$599USD plus shipping
Order your books by Scott Fratcher here
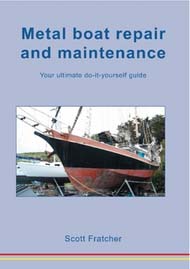
Metal boat repair and maintenance. A must read for any steel boat
owner.
Print:
$31.10
Download:
$12.00

How to repair a steel boat without sandblasting. Special report.
Download:
$4.00

In order to get a good job as a marine engineer we need a marine
engineer licence, commonly called a Certificate of Competency
Print:
$39.49
Download:
$29.50

How to get a job on a mega yacht as a marine engineer? It can
be done without a licence.
Download:
$4.00

50 money making ideas run from a boat
Print:
$39.90
Download:
$39.90
Make money with boats? You bet! It's done every
day, but most people won't tell us how they did it. This book
is a tell all to give the layman the tools needed to start their
own onboard cruising business.
How to make money with boats has become an instant
classic selling around the world making dreams come true. If your
planning a cruise, or your know somone who is this is the perfect
book.
Print:
$39.90
Download:
$39.90

Print:
$21.37
Download:
$9.00
How to buy boats cheap? Dozens of tricks used
by adventurers around the world every day. This book is a must
read for anybody ready to purchase a boat.

Print:
$29.96
Download:
$9.00
The race was a heartbreaker, but eventually Earthrace took the
round the world speedboat record. This book is the log and blog
of the 2007 race where Earthrace set dozens of fastest ocean record
crossings.

Download:
$12.00
Earthrace in color. The same book as above, but in vivid color
to bring all the race moments right to the reader.

Print:
$14.97
Download:
$9.00
Anchor King is a narrative book of short stories of the Sausalito
California waterfront in the late 1980's. Anchor King contains
the award winning short story "Sex Toys?"

Print:
$115.47
Download:
$5.00
Tjalk Operator's Manual is an example of how
to build a yacht manual. Over 300 pages showing how to drive a
twin engine, single rudder vessel and much more.
|