|
By: Scott
Fratcher - Marine Engineer/Captain. Adapted from How
to make money with boats
Modern cruising vessels have high electrical demands, where
refrigeration, radar, laptop computers and even plasma TVs are
the norm. Keeping batteries charged is a challenge, and fitting
a second alternator, says Scott Fratcher, is an easy solution
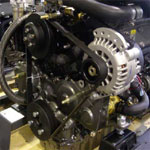
Marine alternator instalation
Want more charge amps? Less time running the engine to keep the
batteries up?
More amps often means either a bigger alternator, or better yet,
a second alternator which adds significantly more potential to
the boat than only increasing the amperage of the original alternator.
Do the math
The math is easy. Imagine a typical diesel with a 55 amp alternator.
If the alternator is removed and replaced with a 100 amp model,
we gain 45 amps. If you add a second 130 amp alternator to the
original 55 amp system, you instantly send a battery-boosting
185 amps into the electrical system.
Safety
Higher charging amps also increases the vessel’s safety
margin. Single alternators may fail due to overwork – the
constant heavy load to recharge the boat’s electrical demand
takes its toll. This could lead to discharged batteries, with
all electrical systems shut down.
I’ve encountered many boaties who’ve spent an uncomfortable
night in the shipping lanes alternating the last of the battery
power between radar and navigation lights.
Many consider the decision to fit a second alternator a no-brainer.
The only question is: how do you install one easily? This article
discusses a technique to mount a second alternator on almost any
inboard engine. And it’s worth noting that the process can
be used to belt drive more than just an alternator – a hydraulic
pump, de-watering bilge pump or anything else you might need to
turn are also possibilities.
Yanmar engine?
Before we start the project check your engine model. Do you have
a Yanmar? If so you may be able to purchase a complete second
alternator kit from Yachtwork.
Yachtwork.com has been building Yanmar highouput marine alternator
bracket kits for over 20 years. The Yachtwork patented production
process allows them to produce a complete alternator bracket kit,
with custom dual groove pulley and jacking style tensioning arm
for just $599USD. This is far less cost than any shop is going
to be able to build a kit for and by far the easiest method of
adding more amperage to boats such as Beneteau, Jenneau, and many
others.
For the rest of marine engines read the instructions below and
decide if the project is writhen your scope or at least print
off the article and bring it to mechanic so he has a basis to
start the project.
SIX STEPS TO ALTERNATOR II
1. Design and planning
2. Mounting a second front pulley
3. Making a base plate
4. Building a bracket from the base plate
5. Installing a belt tensioning device
6. Bolting in the alternator
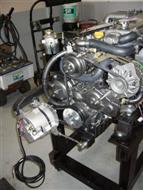
DESIGN AND PLANNING
Start the design process by taking an alternator in hand and
holding it next to the engine with the pulleys aligned.
There should be 12 possible positions: starboard low, starboard
high, port low, port high, and above or below the drive pulley.
Face the alternator aft and you have six more possible locations
– for a total of 12.
Hold the alternator in all 12 positions. Pick the best two or
three positions and compare the possibilities. Choose a mounting
position with the alternator as close to the engine as possible.
Look for access, wire runs, mounting bolt holes in the engine
and cooling air.
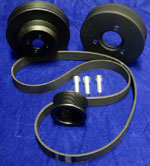
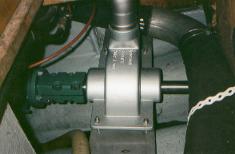
MOUNTING A SECOND PULLEY
We need to spin the second alternator from a second drive pulley
at the front of the engine. Your engine may already have one,
but usually you’ll have to add one, bolting it to the front
of your existing engine pulley.
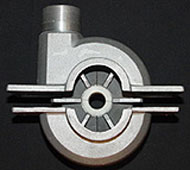
First, choose a pulley size. For a typical 30 to 75hp engine
with maximum rpm of around 3600, a good drive pulley diameter
is about 175mm.
I’ve experimented with larger pulleys (up to 230mm) but
it’s not effective as most engines begin to hunt at low
rpm. Conversely, if the pulley diameter is less than 150mm I often
have to run the engine up to 1200rpm to get a good charge.
If in doubt, duplicating the original pulley size is usually
a good bet.
There are two easy methods to fit a spare pulley to the front
of an engine:
1. Have a machine shop make the new pulley; or,
2. Modify an existing pulley.
METHOD 1
A machine shop makes the new pulley, the simplest but most expensive
option.
The machine shop will need the bolt pattern and centering ring
measurements from the existing drive pulley on your engine. If
you can take the measurements from the manual, the machine shop
should have an easy job. If you have to take the measurements
yourself, use digital calipers. Be sure to scrape away any old
paint so your measurement is metal to metal.
Note: If the alternator is to produce more than 80amps, you should
use a dual belt drive. You’re pushing the limit with a single
belt – it will often slip, leaving gobs of black, sticky
dust in your engine room.
METHOD 2
Buy an “off-the-shelf” pulley at your local hardware
store and have a machine shop make a new centering ring that fits
your engine. You can even use an old car’s sheet metal“stamped”
pulley. The machine shop will combine the pulley onto a centering
ring and you’re ready to install.
This option has the advantage of knowing the pulley face angles
are going to be correct and smooth. It does not take much angle
error, a nick or lathe marks left in the pulley face to make the
belt begin to “dust”. Belt dusting is the major problem
in building a dual alternator system. Twist, misalignment, rough
surfaces, and drawing too much load all add to the amount of the
belt dust. Commercial pulleys help solve this issue.
METHOD 3 For emergency and bush use only
The third method I have never tried, but other mechanics swear
it works and can be built right on board the boat. I include it
here for your perusal.
Go to the local hardware store or wrecking yard and buy a steel
pulley. Lay out the bolt holes and drill them as best you can.
Bolt the new pulley to the old pulley and keep the bolts snug,
but loose enough you can move the pulley around with a light tap
from a hammer. Turn the engine over (without starting) while holding
a marking device on the outside of the pulley. Find the pulley’s
high side and tap it to the center. Keep this up till you have
the pulley perfectly centered. Tighten the bolts.
If you stopped now the pulley would quickly slide out of center
and the whole system would be out of round making a lot of noise,
belt dust and eventually break the bolts and mounts. To prevent
this you drill two or three holes through the new pulley and into
the old pulley. Tap a roll pin into the holes. The roll pins hold
the pulleys in center with each other.
I have never had to resort to this method, and if you do all
I can say is “hope for the best”.
MAKING THE BASE PLATE
The base plate is a steel plate that gets bolted to the engine,
and it becomes the base which holds the soon-to-be fabricated
alternator bracket. The bracket is typically welded to the base
plate.
Look for flat areas on the side of the engine block near where
you want to mount your alternator. You want the plate to cover
a minimum of three bolt holes – five or six is better.
Cut a piece of steel to cover the bolt holes. Using 6mm plate
is the minimum – 8mm is better. Test fit the piece of steel
over the area of the engine block. If it all fits and covers the
bolt holes, you’re ready to start marking and drilling the
holes.
Marking where the holes are to be drilled can be challenging,
especially if the plate is in a difficult to reach location. Here’s
an easy trick – it’s what I call the “sneak
and tap” approach, and involves using a sharpened bolt screwed
into each of the engine bolt holes (one at a time) to serve as
a “reverse punch”.
Leave just enough bolt thread (the sharpened point) showing so
you can use a pair of pliers to remove the bolt. Lay the base
plate in the exact final location. Now for the tricky part –
strike the steel plate with a single sharp blow from a hammer
directly over the punch. Once marked you are ready to drill the
hole.
Remove the bolt/punch and shift it to a new hole. Fasten the
base plate (with a bolt through the newly-drilled hole) in position.
Another sharp tap, remove the plate and drill the new hole. Repeat
this process until all holes are drilled. This method is fast
and easy and leaves no sloppy holes. If you make the base plate
perfect, the rest of the job becomes much easier.
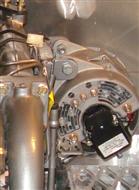
BUILDING A BRACKET
The bracket is the metal frame that holds the alternator, allowing
it to pivot for tensioning the belt. I like to use a 50mm piece
of 6mm flat bar. Cut two ears and weld them on the flat bar at
a 90º angle (see photo).You should now have a base plate
and bracket all made up. They may need to be connected with a
strut (depending on the position of the alternator) to get the
two pulleys in alignment. It’s usually the simplest to weld
the plate, strut and bracket together.
ALIGNMENT
To find the correct alignment for the alternator, lay a wooden
dowel rod in the drive pulley of the engine. Let the rod find
its natural center. You can now simply lift the rod up and down
to show where an exact straight line to the slave pulley will
fall. Reverse the procedure until the slave pulley is pointed
directly at the drive pulley.
Remove all parts and tack the strut into position.
Replace and see if it all fits. If it does it’s time to
weld it up and paint. Use this dowel rod method anytime you want
an easy check of belt alignment.
MAKING A BELT-TENSIONER
Turnbuckle tension arms are an easy solution for making an alternator
adjusting arm, and you only need simple tools – a hacksaw,
welder and a drill. If you were making a conventional car-type
tensioning arm, you’d have to cut an arc in the flat bar
with an oxy-acetylene torch. Many boaties fit this turnbuckle
swing arm to their existing alternator just to solve adjustment
problems.
Begin with a half-inch or larger open barrel turnbuckle, and
remove the studs from the barrel.
Cut the center out of the barrel, leaving leavening 120 to 150mm
of turnbuckle barrel.
Weld the barrel back together. Put the studs back in place and
cut them to the length you worked out for the project at hand.
Weld a flat plate to the end of each stud, drill a hole in the
plates and mount to the engine.
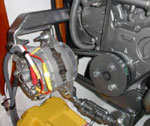
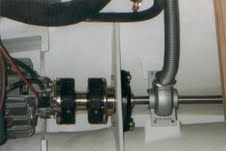
AUTO TENSIONING ARM
An automatic tensioning arm is another easy solution for a DIY
installed alternator.
You can buy a “rasta” or LoveJoy arm for automatic
belt tensioning from a good bearing supply house. Check out http://www.lovejoy-inc.com/
The device costs about $100. Simply mount the roller inside the
unloaded belt between the drive pulley and alternator. In the
photo above, the pulleys turn clockwise. Adjust the tension and
ignore it for the life of the belt.
The second advantage of using a “rasta” or LoveJoy
tensioning arm is the alternator does not have to rotate away
from the engine to adjust the belt. This may mean a lot if you
have a tight space to work in. You simply mount the alternator
as close to the engine as you can manage and let the tensioning
arm take up the belt slack.
STOP ENGINE BEFORE TURNING “OFF”
Ever notice what battery switches have printed on their faces?
We all know not to disconnect the batteries while the engine is
running, but what would happen if we did?
An alternator diode would fail – and that’s not good.
The reason is buried in Ohm’s Law which lays out the relationship
between volts, amps, and watts. An alternator’s total power
output is measured in watts. A typical high-output alternator
might be charging 100amps at 14V – 100 x 14 = 1400 watts.
If we had a 24-volt system, the alternator would be producing
50amps at 28 volts to make 1400 watts.
So, when we have an alternator producing 1400 watts and someone
turns off the battery switch, the 1400 watts is already in the
pipeline, so to speak. But the load (or current or amp draw) just
dropped to zero because of disconnection to the battery.
Ohm’s Law tells us 1400 watts divided by zero (our new
amp load) equals infinity. In other words, the voltage inside
the alternator will climb toward infinity till it finds an escape
route (the path of least resistance). That’s the shortest
path to ground and typically, that’s the thin film inside
a diode. Pop! The diode shorts.
Quickly switching the batteries back on might save the situation,
but usually the damage is done. The boat owner may see the output
of the alternator suddenly drop by a third. A typical complaint
from boaties is: “My 100amp alternator is now producing
66 amps on the meter.”
This is because the alternator stator is really three-phase,
and has three separate windings combining to produce 100amps.
Since only the diode was ruined, each phase of the stator is still
producing 33amps. If all three phases of the alternator are still
producing 33amps each, why is the boat’s electrical meter
only showing 66amps?
The “lost” 33amps are still being produced, but they’re
not being rectified because that is the diode’s job. And
un-rectified means alternating current (AC) is entering your DC
system.
This is bad. At the same time that we are charging at 14 volts
DC, we are also sending a battery-destroying AC “charge”
into the boat’s electrical system. And because the boat’s
electrical charge meter does not read AC, the owner has no clue
something has gone wrong.
Those 33 AC amps are destroying the boat’s battery bank,
electrical boards, and maybe even the hull zincs.
DIODE TEST
To check whether your alternator has a shorted diode you can
clamp the positive alternator output lead with an AC/DC “clamp
amp” meter. Switch the meter to DC amp and read the charge
rate. Switch the meter to AC and we should see three or four amps.
A reading half of the DC charge rate indicates a bad diode. For
example, if we were to see 66amps DC and 33amps AC, this would
tell the technician it’s time to pull the alternator and
change the diode pack.
Although not as accurate, we might also take a high-quality digital
volt meter and measure voltage at the back of the alternator.
We should see around 14 volts, but switch to AC and we should
see around seven volts. Reading 14 volts AC could also indicate
a faulty diode.
Adapted from Scott Fratcher’s How To Make Money With Boats,
available at www.yachtwork.com
|
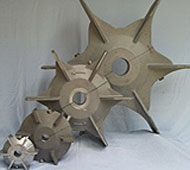
Add
a PTO to any engine
.JPG)
.JPG)
.JPG)
.JPG)
.jpg)
.JPG)
.JPG)
.JPG)
.jpg)
.jpg)
.jpg)
.JPG)
.JPG)
.jpg)
.jpg)
.jpg)
.jpg)
.JPG)
.jpg)
.JPG)
.jpg)
.JPG)
Check hoses for cracks
.JPG)
.JPG)
.JPG)
.JPG)
.JPG)
.JPG)
.JPG)
.JPG)
.JPG)
Basic Fast Flow Emergency Bilge Pump Kit
$599USD plus shipping
Fast flow pump installed.
Always ready - Alwasy pumping

Pump arrives in parts for easy install. No need
to remove the prop shaft
Prop shaft bilge pump installed and ready for
use
Impeller blades split in two for easy install
and come in various sized to meet every boat's needs

Pump is ready for installation.

This is a safe boat with the Fast Flow propeller
driven bilge pump
Example of a propeller driven Fast Flow bilge
pump in operation
Fast Flow emergency bilge pump in position ready
to save the day
Basic Fast Flow Emergency Bilge Pump Kit
$599USD plus shipping
Order your books by Scott Fratcher here
Metal boat repair and maintenance. A must read for any steel boat
owner.
Print:
$31.10
Download:
$12.00

How to repair a steel boat without sandblasting. Special report.
Download:
$4.00

In order to get a good job as a marine engineer we need a marine
engineer licence, commonly called a Certificate of Competency
Print:
$39.49
Download:
$29.50

How to get a job on a mega yacht as a marine engineer? It can
be done without a licence.
Download:
$4.00

50 money making ideas run from a boat
Print:
$39.90
Download:
$39.90
Make money with boats? You bet! It's done every
day, but most people won't tell us how they did it. This book
is a tell all to give the layman the tools needed to start their
own onboard cruising business.
How to make money with boats has become an instant
classic selling around the world making dreams come true. If your
planning a cruise, or your know somone who is this is the perfect
book.
Print:
$39.90
Download:
$39.90

Print:
$21.37
Download:
$9.00
How to buy boats cheap? Dozens of tricks used
by adventurers around the world every day. This book is a must
read for anybody ready to purchase a boat.

Print:
$29.96
Download:
$9.00
The race was a heartbreaker, but eventually Earthrace took the
round the world speedboat record. This book is the log and blog
of the 2007 race where Earthrace set dozens of fastest ocean record
crossings.

Download:
$12.00
Earthrace in color. The same book as above, but in vivid color
to bring all the race moments right to the reader.

Print:
$14.97
Download:
$9.00
Anchor King is a narrative book of short stories of the Sausalito
California waterfront in the late 1980's. Anchor King contains
the award winning short story "Sex Toys?"

Print:
$115.47
Download:
$5.00
Tjalk Operator's Manual is an example of how
to build a yacht manual. Over 300 pages showing how to drive a
twin engine, single rudder vessel and much more.
|